Leaking of sink faucets not only wastes water resource, but also leads to corrosion on the fixtures during to high moisture exposure. Before we try to fix the leaky faucet, we should know what type your sink faucet is and why the faucet leaks. In general, sink faucets are featured with ball style spigots. If the faucet leaks, the most suspicious segment is sediment buildup and worn springs and seals. Following are the procedures for repairing leaky sink faucets.
1. Shut off water source
Remember to shut off water source before fixing taps, if you do not want get uncontrollable water splashes. The water source valves are placed underneath the sink, and do not forget to turn off both hot and cold valves. After that, you can double check whether the water is completely shut off by rotating the faucet.
2. Remove the faucet head
Gently use the screwdriver to remove the screw on the faucet handle until the ball joint is exposed in front of you.
3. Check the cap and adjusting ring.
It is possible that your leaking comes from the cap and adjusting ring. Use your needle nose pliers to tighten the adjusting ring, if the faucet still leaks, then you should replace the faucet’s seats and springs.
4. Remove ball joint assembly
Loosen up ball joint head with your Allen head wrench. After the joint head is completely off, use the head wrench again to remove the entire ball joint. Be careful not to scratch the finish of your faucet.
5. Remove inlet seat and spring
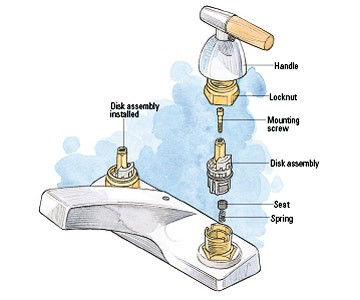
Look into the valve and you will see a small circular part called “seat”, and beneath it is the “spring”. Remove the seat spring off the inlet with your nose pliers. Bring the used spring to hardware store to purchase a same-sized new spring. In this way, your new spring will totally match up the rest undestroyed parts of your sink faucets.
6. Install new inlet spring
Reinstall your inlet spring back into the seat and place your seat back into holes. If the seat is not placed exactly as it used to, it may adds up the possibilities of future leaking.
7. Reverse the steps you completed.
Reinstall your ball joint and make sure to align the pin and the valve to the slot on the ball. Next, reinstall cam assembly, and make sure the cam assembly is aligned down over the ball joint base of the groove. Finally, screw the cap one the valve and reinstall the handle.
8. Turn your water back on.
Remember to run some water randomly before using it, because some grease residue caused by your repair procedure needs to be run out. Up to this point, I am glad that your faucet is not dripping anymore. However, your job is not done yet, faucet daily cleaning is still important for your sink faucet. If you don’t clean it over time, corrosion of your valve seat will produce leaks again.




Post Comments
You must be logged in to post a comment.
click here to log in